Lemurian Blue meditation grids and crystal pairings offer a unique bridge between deep geological grounding and expansive intuitive vision. While many crystal grids rely on single-crystal quartz points or uniform calcite bases, working with Madagascar’s Lemurian Blue—petrologically classified as a plagioclase anorthosite—introduces the mechanics of a dual-action energetic capacitor. Its dense, iron-bearing pyroxene groundmass provides an unshakeable anchor to physical reality, while the iridescent, labradorescent flashes flaring from its feldspar twin planes awaken the Third Eye and Throat chakras.
Achieving harmonic resonance with this ancient, plutonic stone requires more than placing arbitrary crystals in a pattern. Because its submicroscopic exsolution lamellae scatter light across dynamic, multi-spectral wavelengths, certain minerals amplify its visionary clarity, whilst others create chaotic energetic friction. Whether you are constructing a protective astral boundary, seeking clarity during hypnagogic dream incubation, or looking to ground higher-frequency downloads into somatic stability, this guide explores the essential crystal allies to combine, the clashing stones to avoid, and step-by-step sacred geometry layouts designed to harness the full potential of Lemurian Blue.
The Energetic Anatomy of Anorthosite
To construct an effective crystal grid around Lemurian Blue Granite, one must first understand how its physical geology dictates its metaphysical behaviour.
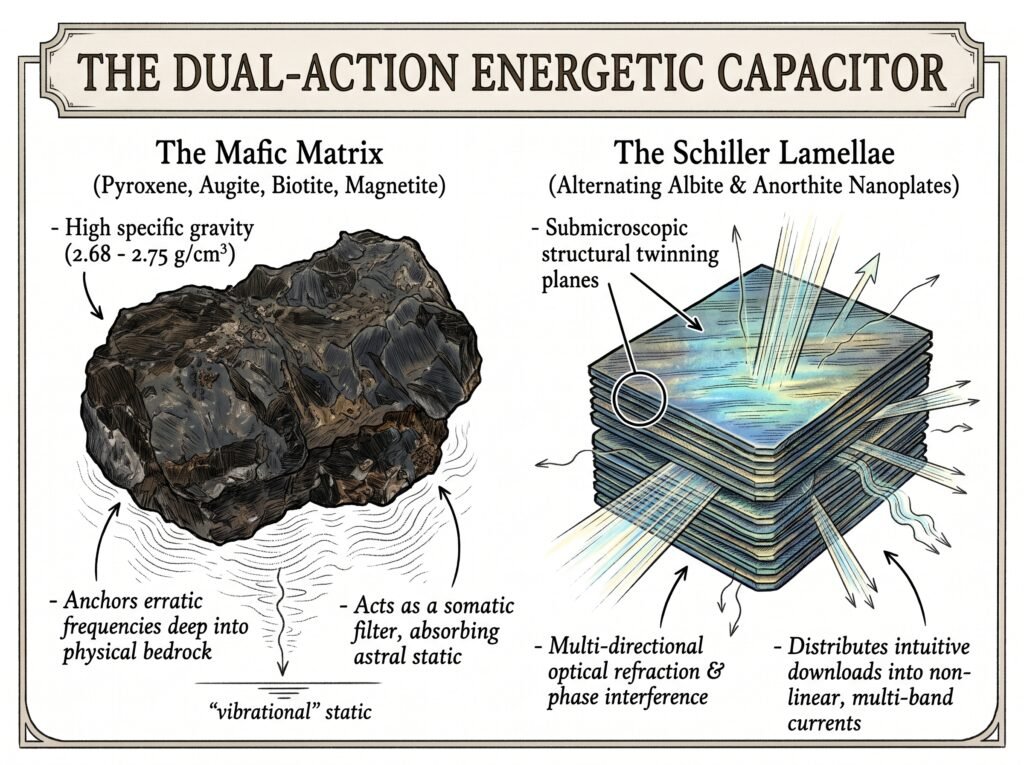
- The Mafic Anchor: The dark, underlying groundmass—composed of augite, hypersthene, biotite, and magnetite—provides massive, earth-bound density. In grid mechanics, this prevents the common “ungrounding” sensation experienced when channeling high-frequency stones like Moldavite, Phenakite, or Herkimer Diamonds.
- The Schiller Refraction Engine: The flashes of royal blue, cyan, and gold are created by light entering parallel exsolution lamellae. Esoterically, this structure breaks up stagnant, rigid energetic patterns. Instead of transmitting a single, laser-like frequency, anorthosite scatters energy across a broad spectrum of subtle wavelengths, stimulating the Third Eye (Ajna) and Throat (Vishuddha) chakras without overwhelming the nervous system.
Mineralogical Pairings: Synergies and Structural Clashes
Pairing stones with anorthosite requires balancing its dual nature: high-vibration optical flash supported by dense plutonic bedrock.
Harmonic Synergies (Optimal Mineral Allies)
| Companion Mineral | Chemistry & System | Functional Synergy with Anorthosite |
| Black Tourmaline (Schorl) | Complex Borosilicate (Trigonal) | Anchors the electrical discharge generated during deep meditation; forms a closed auric circuit with the pyroxene groundmass. |
| Clear Quartz (Herkimer or Brazilian) | $\text{SiO}_2$ (Trigonal) | Translates the diffuse, multi-spectral Schiller flashes into clean, directional vectors of intentional thought. |
| Lepidolite | Potassium Lithium Aluminium Silicate (Monoclinic) | High lithium content calms cognitive restlessness, allowing the practitioner to sustain long visualisations within the blue flash planes. |
| Danburite | Calcium Borosilicate (Orthorhombic) | Resonates with the calcium-rich anorthite component of the feldspar, creating an etheric bridge to higher transpersonal chakras. |
| Larimar (Pectolite) | Sodium Calcium Silicate Hydroxide (Triclinic) | Shares the triclinic crystal system of labradorite; softens the electrical edge of the feldspar with soothing, fluid water energy. |
Incompatible Pairings (Energetic Friction & Clashes)
- Carnelian & Red Jasper (High-Iron Microcrystalline Silicates): The aggressive, physical, externalised fire energy of red cryptocrystalline quartz directly opposes the receptive, deep-ocean introspection of anorthosite. Combining them often results in emotional agitation, restless limbs, or fragmented focus during grid work.
- Pyrite (Iron Disulphide): Pyrite carries an unyielding, rigid, solar-masculine frequency. Its brassy, metallic shield reflects energy outward, cutting off the internal reflective pathways created by the stone’s lamellar twin planes.
- Raw Moldavite (When Unbuffered): Pairing a high-velocity meteoric impact glass directly with anorthosite without a balancing intermediary (such as Smoky Quartz or Black Tourmaline) can cause spatial disorientation, headaches, and rapid cognitive fatigue.
The Three Master Anorthosite Grid Protocols
These three specialised grid blueprints leverage the physical properties of Lemurian Blue Granite for specific spiritual applications.
Grid Protocol 1: The Hexagonal Astral Shield (Auric Boundary Grid)
- Objective: Cleanse the immediate environment of psychic residue, neutralise electromagnetic smog, and establish an impenetrable meditative boundary.
- Geometric Template: Metatron’s Cube or a standard Hexagon (6-fold radial symmetry).
Components
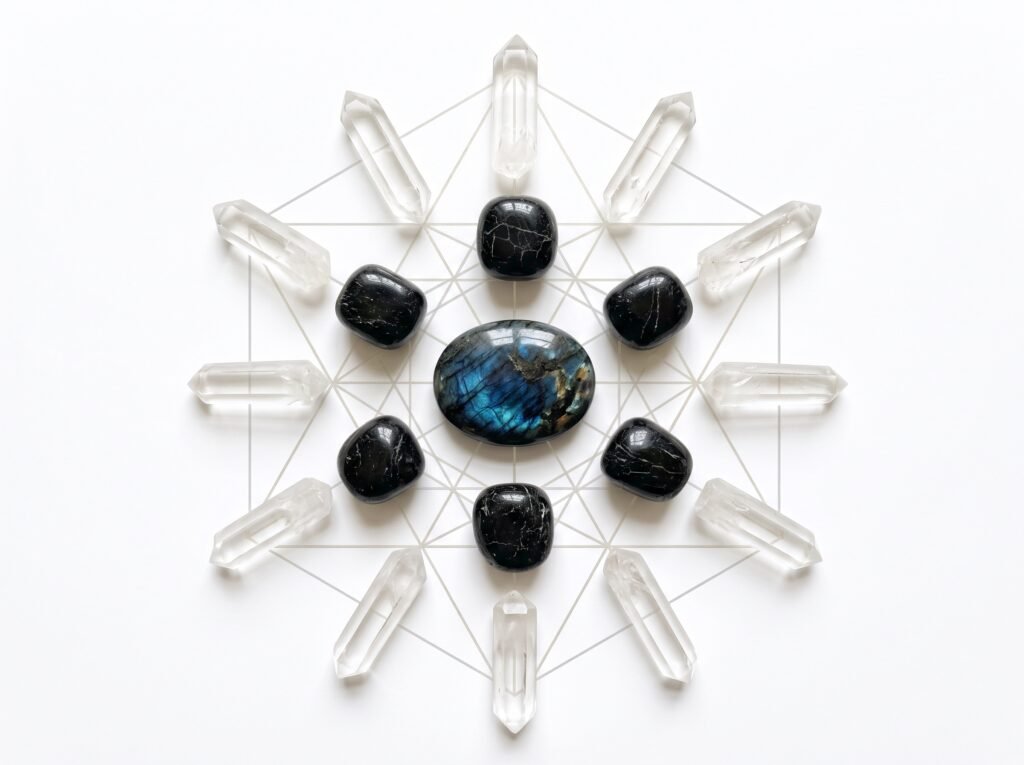
- Keystone (Centre): 1 polished Lemurian Blue Granite slab or palm stone (flat base).
- Inner Ring (6 Nodes): 6 tumbled Black Tourmaline stones.
- Outer Ring (6 Nodes): 6 single-terminated Clear Quartz points (pointing outward to direct stagnant energy away from the room).
Activation Sequence
- Place the Lemurian Blue keystone at the exact geometric centre of your grid cloth or wooden base.
- Form the inner perimeter by placing the 6 Black Tourmaline stones clockwise around the keystone, starting at True North.
- Form the outer perimeter by placing the 6 Clear Quartz points directly behind the Tourmaline nodes, ensuring all terminations face away from the centre.
- Using a Quartz or Selenite wand, connect the stones: start at the Lemurian Blue keystone, draw a line of light to the North Tourmaline, out to the North Quartz point, then trace clockwise to the next Quartz, back into the next Tourmaline, and return to the keystone. Complete three continuous circuits.
Grid Protocol 2: The Vertical Anchor (Visionary Dream & Intuition Incubation)
- Objective: Stimulate lucid dreaming, intuitive downloads, and clear hypnagogic imagery without losing physical grounding during sleep.
- Geometric Template: The Vesica Piscis or a Linear Vertical Axis.
Components
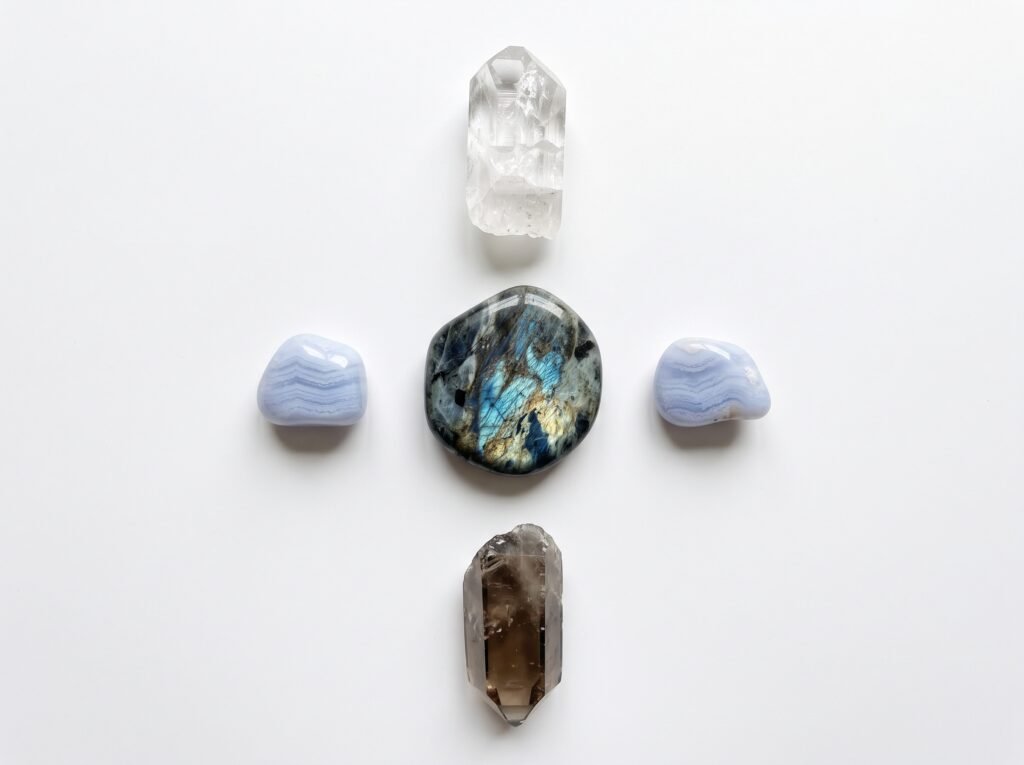
- Keystone (Centre): 1 Lemurian Blue Granite stone angled to reflect natural or ambient low light.
- Upper Crown Node: 1 natural Danburite crystal or Herkimer Diamond (pointing toward your resting head).
- Lateral Balance Nodes: 2 polished Blue Lace Agate or Larimar tumbled stones (placed East and West).
- Lower Root Node: 1 tabular Smoky Quartz or Black Moonstone (placed South, grounding toward the floor).
Activation Sequence
- Position the grid on a nightstand or table within 2 metres of your bed.
- Set the Lemurian Blue stone at the centre. Align its primary Schiller flash plane toward your pillow.
- Place the Danburite at the top (North), the Blue Lace Agate to the left and right (West/East), and the Smoky Quartz at the base (South).
- Tap the Danburite once, draw a vertical line straight through the Lemurian Blue keystone, and terminate the current in the Smoky Quartz. Whisper your seed intention into the central flash plane before resting.
Grid Protocol 3: The Star Tetragram (Subconscious Shadow Integration)
- Objective: Access deeply buried emotional conditioning, unpack unconscious resistance, and integrate fragmented aspects of the shadow self.
- Geometric Template: 4-Pointed Square / Diamond Axis.
Components
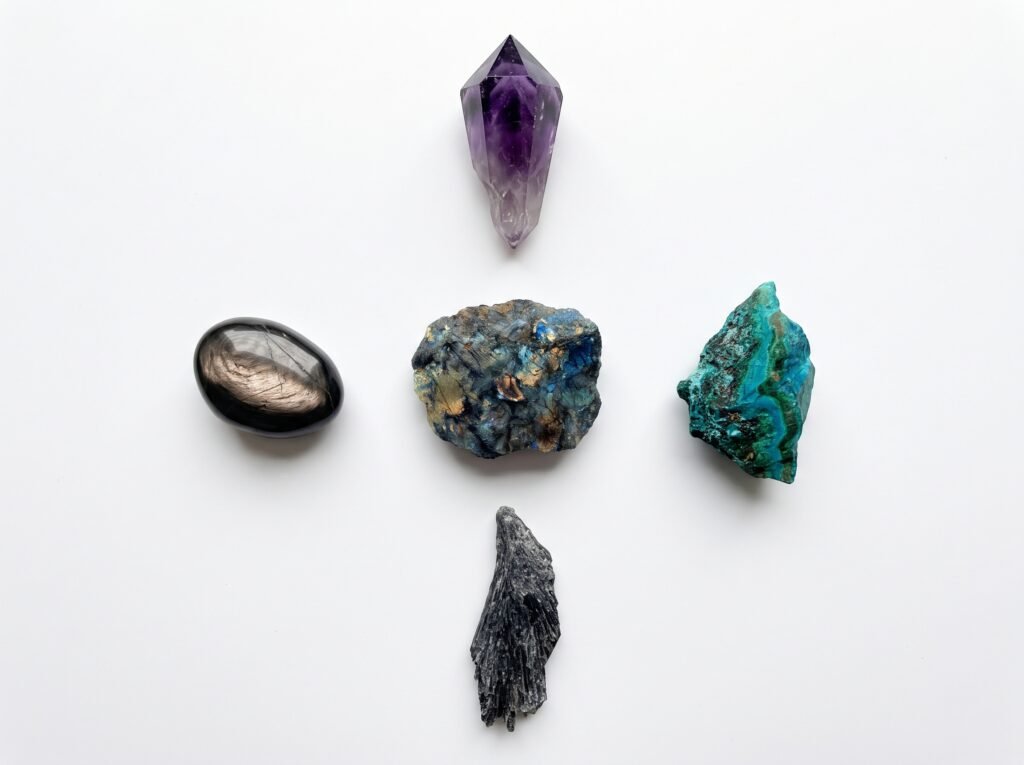
- Keystone (Centre): 1 raw or unpolished specimen of Lemurian Blue Granite (to engage raw, unworked plutonic energies).
- North Node (Mental Clarity): 1 deep purple Amethyst point (pointing inward).
- South Node (Somatic Grounding): 1 Magnetite (Lodestone) or Black Kyanite blade.
- East Node (Emotional Fluidity): 1 Chrysocolla or Malachite-in-Chrysocolla piece.
- West Node (Spiritual Shield): 1 Hypersthene or Bronzite tumbled stone.
Activation Sequence
- Set the raw Lemurian Blue specimen in the centre.
- Position the four cardinal stones: Amethyst (North), Magnetite (South), Chrysocolla (East), and Hypersthene (West).
- Connect the diamond boundary: trace from North to East, East to South, South to West, and West back to North.
- Finally, plunge the activation wand down through the centre of the diamond into the raw keystone, visualising a vertical pillar of deep cyan light anchoring into the bedrock beneath your space.
Maintenance, Energetic Clearing, and Deconstruction
Because anorthosite is structurally dense and absorbs considerable energetic resonance during deep introspective work, it requires dedicated clearing protocols to maintain its optical and vibrational responsiveness.
Anorthosite Grid Care & Clearing Guide
Recommended Methods
- Acoustic Clearing: 432 Hz tuning forks or bronze singing bowls.
- Smoke Cleansing: Frankincense resin, sweetgrass, or cedar.
- Lunar Irradiation: Overnight exposure to waning/full moonlight.
Forbidden Methods
- Harsh Chemicals / Vinegar: Acid reacts with calcic plagioclase.
- Direct Solar Exposure: UV radiation dulls fine lamellar iridescence.
- Saltwater Baths: Salt crystals lodge in cleavage planes, crazing.
Deconstructing the Grid
Never dismantle an active anorthosite grid haphazardly. Break the circuit in the reverse order of assembly:
- Retract the intention by touching your activation wand to each outer perimeter stone counter-clockwise, directing the remaining energy back into the central keystone.
- Remove the outer directional points first.
- Remove the grounding and stabiliser stones second.
- Lift the central Lemurian Blue Granite keystone last, placing it on a natural linen cloth or wooden surface to rest.
- Sound a bell, chime, or acoustic bowl three times over the working space to fully clear the energetic footprint.