With its luminous, honeyed glow and uplifting citrus hues, lemon calcite has quickly become a favourite among mineral collectors and crystal enthusiasts alike. However, surging popularity in the gemstone market has brought an unwelcome side effect: the rapid rise of deceptive imitations and treated stones. Identifying Fake Lemon Calcite has never been more vital, whether you are inspecting dyed quartz, tinted common marble, moulded resin, or even glass passed off as the genuine article.
Telling authentic material apart from synthetic or treated substitutes requires more than just a quick glance. While true lemon calcite possesses distinct natural banding, a delicate waxy lustre, and characteristic structural cleavages, counterfeits often give themselves away through artificial pigment pooling, unnatural hardness, or the tell-tale presence of microscopic air bubbles.
Before parting with your money, running a few fundamental checks can save you from a disappointing purchase. In this guide, we break down the definitive physical traits, simple at-home assessments, and mineralogical tests required to confidently authenticate your specimen and ensure you are taking home authentic calcium carbonate.
Primary Market Counterfeits and Lookalikes
Before conducting physical tests, familiarise yourself with the materials most commonly passed off as Lemon Calcite:
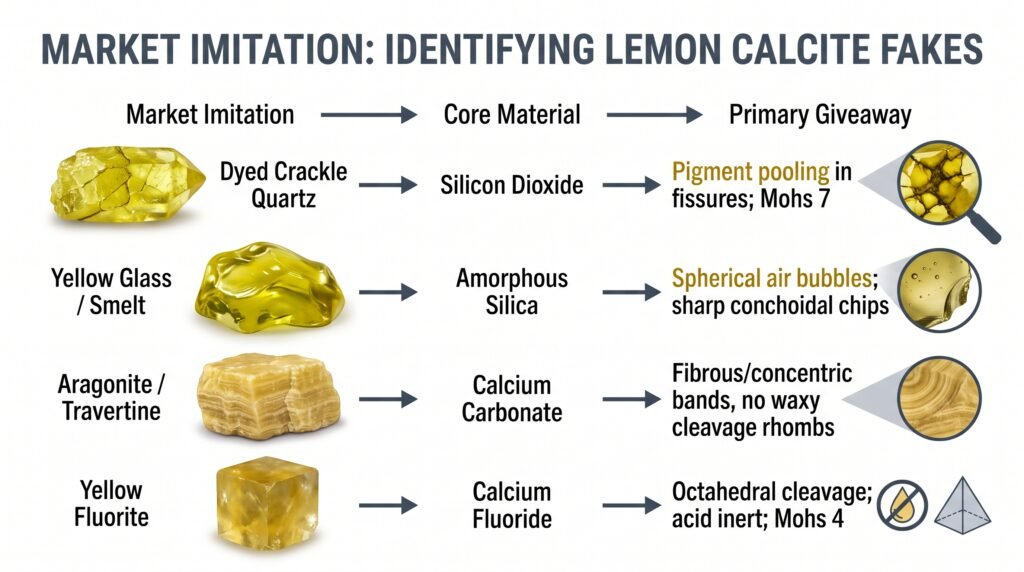
Dyed “Crackle” Quartz
Low-grade milky quartz is thermally shocked (heated, then quenched in cold liquid) to induce dense internal fracturing, then soaked in synthetic yellow dye.
- The Tell: Pigment aggregates heavily inside the fracture lines. Quartz is also significantly harder and will not react to carbonate chemical tests.
Coloured Glass (“Smelt Quartz” or Slag)
Melted silica coloured with metal oxides is moulded or cut into rough chunks, spheres, and obelisks.
- The Tell: Glass lacks an internal crystal lattice. Under magnification, it frequently reveals round micro-bubbles and breaks with smooth, shell-like (conchoidal) curves rather than stepped geometric planes.
Dyed Calcite (White Calcite Artificially Coloured)
Low-grade, chalky white calcite or marble soaked in yellow chemical dye.
- The Tell: The base physical tests will show it is real calcite, but the colour is superficial. A cotton swab dipped in acetone rubbed over an inconspicuous groove will often strip the artificial pigment away.
Visual and Tactile Inspection (Non-Destructive Checks)
Before applying tools, examine the specimen under strong, natural lighting. Authentic Lemon Calcite presents specific visual and tactile anomalies that manufactured fakes fail to replicate:
The “Soapy” Waxy Lustre
Genuine calcite possesses a distinct tactile quality: it feels slightly waxy, greasy, or “soapy” to dry fingertips. Polished glass, quartz, and resin feel starkly smooth, glassy (vitreous), or plastic-like.
Cleavage Steps vs Conchoidal Fractures
Calcite has perfect rhombohedral cleavage in three directions at approximately $74.5^\circ$. Even on polished or tumbled stones, examine the interior with a $10\times$ loupe:
- Genuine Calcite: Displays internal, stepped, parallel geometric planes (resembling a stack of leaning micro-cubes).
- Glass or Quartz: Fractures in curved, swirling, concave ripples with razor-sharp edges (conchoidal fracture).
Double Refraction (Birefringence)
Transparent to semi-translucent specimens of Lemon Calcite have an exceptionally high birefringence ($0.172$).
- The Test: Place a clear section of the stone directly over a printed line of text on a page.
- The Result: Authentic calcite splits light into two polarised rays, causing the printed letters beneath to appear doubled. Neither glass nor quartz exhibits this level of visible double refraction.
The Mohs Hardness Scratch Test
The most decisive mechanical method to rule out quartz and glass is a controlled hardness test. Calcite defines Grade 3 on the Mohs hardness scale, making it relatively soft and easily abraded.
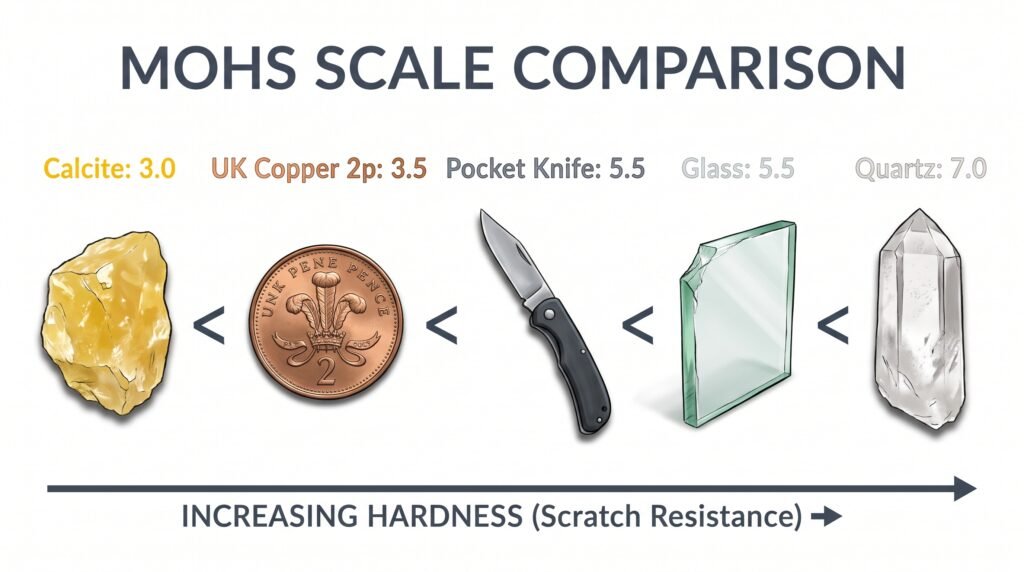
Performing the Scratch Test
- Select an inconspicuous area (such as the base of a tower, underside of a carving, or a hidden crevice).
- Use a standard UK pre-1992 bronze/copper coin or a copper wire ($3.5$ Mohs), or an ordinary steel pocket knife/sewing pin ($5.0\text{–}5.5$ Mohs).
- Apply moderate pressure and drag the tip across a $2\text{ mm}$ line.
- Wipe away the resulting dust to inspect the surface:
- If a genuine groove is carved into the stone: The specimen is soft ($\le 3.5$), confirming it is within the calcite range.
- If the metal skates off without leaving an indentation: The specimen is glass ($5.5$) or quartz ($7.0$), proving it is not genuine calcite.
Note: Calcite will never scratch standard window glass ($5.5$). If your specimen can scratch a glass slide, it is an imitation.
The Acid Effervescence Test: Chemistry and Safety
Because Lemon Calcite is calcium carbonate, it undergoes an immediate chemical reaction upon contact with an acid, liberating carbon dioxide gas:
$$\text{CaCO}_3\text{ (s)} + 2\text{H}^+\text{ (aq)} \longrightarrow \text{Ca}^{2+}\text{ (aq)} + \text{H}_2\text{O (l)} + \text{CO}_2\text{ (g)}\uparrow$$
Quartz, glass, fluorite, and plastic do not react to weak acids.
Safe Testing Protocol (The Household Vinegar Method)
While professional geological laboratories use dilute $5\%$ hydrochloric acid ($\text{HCl}$), you should use standard household white vinegar (approx. $5\%$ ethanoic/acetic acid) to avoid damaging fine specimens or creating safety hazards.
- Step 1: Place the specimen on a stable, chemical-resistant surface.
- Step 2: Using a pipette or the tip of a cotton bud, place a single micro-droplet of white vinegar onto an unpolished or discrete area.
- Step 3: Use a $10\times$ hand loupe to observe the droplet immediately.
- The Result: Within 5 to 15 seconds, tiny bubbles of carbon dioxide will form within the droplet and rise to the surface.
- Crucial Cleanup: Immediately dab the spot dry with a damp paper towel and rinse with water to stop the etching process. Leaving acid on calcite will permanently dissolve the surface polish, leaving a chalky white pit mark.
Summary Authentication Checklist
| Test Method | Authentic Lemon Calcite | Dyed Quartz Imitation | Coloured Glass Fake |
| Tactile Feel | Waxy, slightly soapy | Smooth, hard, glassy | Smooth, cool, vitreous |
| Scratch by Steel Pin | Yes (scratches easily) | No (skates off) | No (equal hardness) |
| Scratch Glass? | No (too soft) | Yes (leaves deep mark) | No (skates/scuffs only) |
| Internal Fractures | Stepped, parallel cleavage planes | Irregular cracks with pooled dye | Conchoidal swirls, round air bubbles |
| Optical Doubling | Strong (birefringent) | None (single refraction) | None (isotropic/glass) |
| Vinegar Reaction | Fizzes (releases $\text{CO}_2$ bubbles) | Completely inert (no bubbles) | Completely inert (no bubbles) |
| Acetone Swab Test | Clean (no dye transfer) | May bleed dye from fissures | Clean (colour is fused in silica) |
By systematically pairing visual fracture checks with a non-destructive optical test and a discrete hardness scratch, you can definitively authenticate real Lemon Calcite without risking irreversible damage to your collection.