
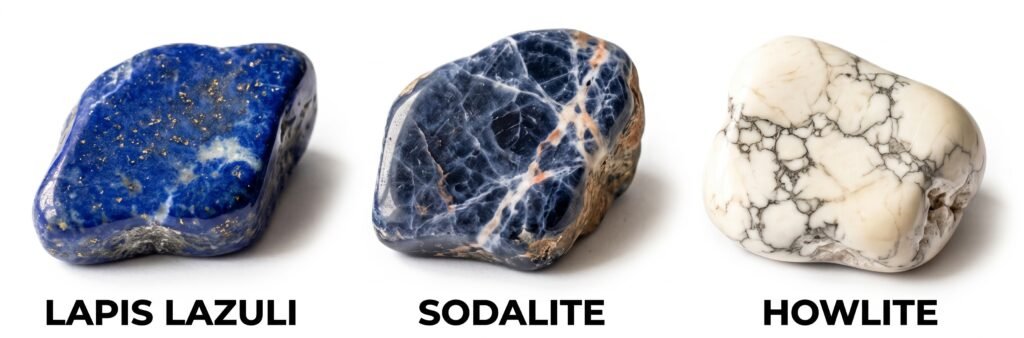
Learning how to spot fake lapis lazuli has become essential for anyone buying, collecting, or crafting with this ancient blue gemstone. As high-grade material from historical deposits in Badakhshan grows increasingly scarce, the market has seen a surge in deceptive substitutes. Commercial bead strands, tumbled pocket stones, and jewellery mounts frequently feature chemically dyed howlite, natural sodalite, or reconstituted resin powders masquerading as genuine, untreated rock.
True lapis lazuli is not a single, uniform mineral. It is a dense metamorphic aggregate defined by rich lazurite, irregular veins of white calcite, and naturally embedded flecks of brassy-gold pyrite. Because mass-produced imitations either lack these geological markers entirely or simulate them poorly using plastic fillers and flat glitter, a few straightforward diagnostic checks can quickly reveal whether your piece is an authentic relic of the earth or a synthetic imitation.
The following practical guide walks through the exact physical, optical, and solvent tests you can carry out at home to verify your stones before investing in your collection.
Quick Visual & Composition Reference
Before testing, it helps to understand what genuine lapis lazuli actually looks like compared to its most common imitators:
| Material | Base Colour & Texture | Key Inclusions | Distinctive Red Flags |
| Genuine Lapis Lazuli | Deep, uneven royal to ultramarine blue; dense opaque stone | Natural golden pyrite flecks with subtle veins or clouds of white calcite | High-grade specimens feature fine micro-pyrite; lower grades show more white calcite marbling. |
| Dyed Howlite / Magnesite | Chalky, intense cyan-to-cobalt blue; glossy or waxy finish | Dark grey, brown, or black web-like spider veins | No brassy pyrite. White core exposed in drill holes; dye wipes off with solvent. |
| Sodalite | Mottled denim, royal, or indigo blue with a translucent edge | Off-white, grey, or yellowish nepheline/calcite streaks | Zero metallic pyrite. Shows a vitreous, glassy sheen rather than lapis’s characteristic waxy-to-dull polish. |
| Synthetic / Gilson Lapis | Flat, completely uniform, electric cobalt blue | Artificially introduced flakes of metallic glitter or pyrite substitute | Flakes are unnaturally distributed, flat, or mirror-smooth under a loupe; zero natural calcite veining. |
| Reconstituted / Resin | Opaque, light to medium blue with a plasticky or smooth surface | Copper, brass dust, or foil specks | Exceptionally lightweight; feels warm immediately; emits a chemical or burnt odour when heated. |
The Step-by-Step Authentication Framework
Perform these tests in order, progressing from non-destructive observational checks to minor physical and chemical verification tests.
1. Perform the 10x Loupe & Inclusions Inspection:
Examine the stone under bright, indirect daylight or a dedicated gemmological daylight lamp using a 10x loupe.
- Check the Pyrite: Genuine pyrite inclusions present as irregular, crystalline brass-yellow specks with metallic luster embedded at varying depths within the rock matrix. If the “gold” flecks sit strictly on the surface, resemble flat glitter flakes, or appear stamped in uniform clusters, the specimen is synthetic or resin-cast.
- Inspect the Calcite: Look for organic, irregular white calcite patches. Natural lapis almost always displays micro-veins or subtle clouds of calcite. If the blue is flat, saturated, and completely homogeneous without microscopic depth, suspect Gilson synthetic lapis or dye saturation.
- Examine Beads and Drill Holes: Inspect the entry and exit points of drilled beads. If colour concentration deepens dramatically around the drill hole, or if the interior of the hole reveals a stark white powder core, the piece is dyed howlite or magnesite.
2. Check Thermal Conductivity and Weight:
Authentic lapis lazuli is a dense rock aggregate with a specific gravity of roughly 2.70 to 2.90.
- The Touch Test: Rest the stone against your cheek or the inside of your wrist. Natural mineral rock conducts heat away from your skin slowly and will feel noticeably cold to the touch. Plastics, resins, and polymer clays warm to body temperature almost instantaneously.
- The Heft Test: Place the piece in your palm and gently bounce it. Synthetic plastic and polymer compounds feel light and hollow. Reconstituted or genuine lapis carries a solid, stony heft.
3. Conduct the Acetone Wipe Test:Perform on an inconspicuous area such as the back of a cabochon or inside a bead hole.
Dip a clean cotton swab or white microfiber cloth into standard technical acetone or high-concentration nail varnish remover.
- Procedure: Firmly rub the swab across a discreet patch of the stone for 15 to 20 seconds.
- Evaluating Results:
- Natural, Untreated Lapis: The swab will come away completely clean. Natural lazurite colour is chemically bound within the mineral lattice and will not lift with acetone.
- Dyed Howlite / Low-Grade Lapis: The swab will pick up blue or purple pigment immediately, often leaving a pale or chalky patch on the stone surface.
4. Execute the Scratch and Hardness Test:Caution: Destructive test – do not perform on finished fine jewellery faces.
Lapis lazuli measures between 5.0 and 5.5 on the Mohs hardness scale.
- Testing with a Copper Coin (Mohs ~3.0): Rub an old copper penny firmly over an unpolished section. Natural lapis lazuli will not scratch, while soft polymer resins and waxes will score easily.
- Testing with an Ordinary Iron/Steel Nail (Mohs ~5.0–5.5): An iron nail should be near identical in hardness to genuine lapis, requiring deliberate, heavy pressure to leave a fine mark. Conversely, dyed howlite (Mohs 3.5) scratches very easily with gentle pressure, shedding white powder. Sodalite (Mohs 5.5 to 6.0) is slightly harder and resists scratching better than lapis.
5. Run Long-Wave Ultraviolet (UV) Inspection:
Place the specimen under a 365 nm long-wave ultraviolet light source in a dark room.
- Calcite Fluorescence: Natural calcite veins within genuine lapis lazuli frequently fluoresce an unmistakable chalky orange, salmon pink, or dull yellow.
- Sodalite Fluorescence: Sodalite often displays an energetic, bright orange-to-yellow glow across broad areas (hackmanite varieties fluoresce brightly).
- Synthetic Resins & Dyes: Polymers and artificial glues frequently display a uniform dull greenish-yellow glow across the entire surface matrix, or show neon-blue haloing where dye has concentrated in surface fractures.
Deep-Dive: Identifying the Top 3 Imitators
1. Dyed Howlite and Dyed Magnesite
Howlite ($\text{Ca}_2\text{B}_5\text{SiO}_9(\text{OH})_5$) and magnesite ($\text{MgCO}_3$) are naturally chalk-white minerals featuring dark webbed veins of host rock. Because of their porous, chalky structure, manufacturers soak them in blue artificial dye to mimic turquoise and lapis lazuli.
- How to distinguish: Genuine lapis lazuli never exhibits webbed, spider-vein black lines. Furthermore, howlite has zero natural pyrite content. If a seller offers cheap blue beads that show dark webbing alongside a complete absence of golden flecks, you are inspecting dyed howlite.
2. Natural Sodalite
Sodalite ($\text{Na}_8(\text{Al}_6\text{Si}_6\text{O}_{24})\text{Cl}_2$) is an authentic natural mineral and a structural cousin to lazurite. Because sodalite is far more abundant and cheaper to extract, unscrupulous traders regularly market it as “Denim Lapis” or “Blue Lapis.”
- How to distinguish: Sodalite features a distinct greyish-blue or violet-blue tone accompanied by cloudy, translucent streaks of white nepheline or feldspar. It almost completely lacks the metallic golden pyrite inclusions that characterise authentic lapis. In thin slabs, sodalite is slightly translucent at the edges, whereas lapis lazuli remains strictly opaque.
3. Reconstituted Lapis & Gilson Synthetics
- Reconstituted Stone: Created by combining pulverised lapis processing dust, low-grade mineral scraps, dyed chalk, and synthetic resin binders pressed under high pressure. These stones often incorporate brass or copper powder to simulate pyrite. They are revealed by their smooth, plasticky texture, lightweight feel, and negative reaction to heat or acetone.
- Gilson Synthetic Lapis: Developed by Pierre Gilson in the 1970s, this lab-created material mimics lazurite chemically. While an impressive achievement, Gilson lapis lacks the random, natural variation of geological contact metasomatism. The pyrite particles are flat, uniform in size, and evenly sprinkled, lacking the dimensional, irregular cluster formations seen in genuine Afghan material.
Retailer & Buyer Checklist: Summary Guidelines
When purchasing or authenticating lapis lazuli specimens:
Always look for genuine pyrite: Metallic, brassy specks with natural depth under magnification remain the clearest indicator of geological origin.
Inspect the price-to-size ratio: Untreated, deep-blue Afghan lapis of AAA grade is a premium commodity. Large, flawlessly uniform beads selling at nominal prices are almost certainly dyed magnesite, howlite, or synthetic resin.
Verify drill holes and backings: Always check rough fractures, edges, and bead interiors for telltale white cores.
Demand transparency on treatments: Natural lapis is occasionally waxed or oil-treated to enhance polish and seal calcite. While traditional waxing is an accepted industry finish, heavy polymer impregnation or chemical dye dips must always be disclosed.
